What You'll Find Here!


A collection of questions asked pretty often by new Maya users.


Tuesday

Realtime Artifacts and Distortion

Q: My models flicker with artifacts in the viewport. What can I do about it?


A:  The problem occurs when there is too extreme of a gap in the camera's near and far clip values.  For example 0.001 and 10000. Values of 0.1 and10000 or even 1.0 and 10000 are less problematic.

Note: If your entire 3D viewport is flickering then you may have video card issues.

Saturday

I Can't Edit My Model Normally

Q :Why are the points/edges/etc I select on my model colored orange/red/yellow, and why does moving them affect more of my model than I want them to?


A: You turned on Soft Selection [most likely by hitting the "b" key] Hitting the "b" key again will turn it off, or you can take the long route and open the tool settings and toggle it there.

NOTE: this mode can be activated and used within the UV Texture Editor as well.

Mental Ray Missing

 Q: Where did my Mental Ray renderer go?


A: It's probably not loaded, go to Window>Settings/Preferences> Plug-in Manager and look for "Mayatomr.mll".


Note: As of Maya 2017, the renderer Mental Ray is no longer included and was replaced with Arnold.  The Mental Ray Standalone version is still available.

Missing Manipulators

Q: I can't see my move/rotate/scale manipulators, why?


A: Hit the + or - key to resize the them.  Also, if the rotate tool just won't show, it could be a display problem, you might need to update or roll back your graphic drivers. In all fairness, I've closed and reopened Maya and had the problem go away [yeah what the hell right?]

Models Distort When Rotated

Q: Why do my models stretch and distort when I try to rotate them?


A: Sounds like a case of double grouping, check your Outliner and ungroup them.  This can occur after a lot of extract, duplicate face operations pile up in addition to user grouping that doesn't take this history into account. The grouping gets messy with the extra transformation nodes(nodes that store size, position and rotation information).

Missing Menus

Q: I'm trying to follow a tutorial and it says I need to go to the "Modeling" menu set, its not there, why?


A: In later versions the menu set "Modeling" was split up into "Polygons" and "Surfaces". If this doesn't sit well with you then you can choose "customize" and create your own set.

Interface Disappeared

Q: I clicked something or pressed a key and my shelf and toolbar thing went missing, what do I do?


A: If you pressed Ctrl + Space then you've hidden most of the UI, pressing it again will bring it back.  Also you can bring back individual portions of the interface by going  to Display>UI Elements and checking on whatever you need or just show/restore them all and that option is found under the same Display menu. If you've hidden the main menus then you can access this display menu from the hotbox, simply hold down the space bar.

Is MEL Needed?

Q: Do I need to learn MEL to make cool images with Maya?


A: No. While it isn't necessary, it is extremely handy since it can be used to create tools that speed up tasks tremendously, create unique effects and provides a better understanding of what goes on within Maya.

Is Programming Experience Needed to Learn MEL

Q: Do I need programming experience to learn MEL?


A: No. Prior programming experience can make concepts involved in MEL far easier to grasp though.

What 3D Software Should I Use?

Q: Which is better, Max, Maya or XSI?


A: They all can do pretty much the same things and they all have not so perfect sides to them, there are trials and learning editions, try them, find what suits you best and make a decision. It doesn't stop with those three programs, there is Lightwave, Cinema 4D and Blender (which is taking big steps and is free).

 Yeah yeah, I know the Maya icon is old but its my favorite <3.

NOTE:  Autodesk has announced that early 2016 Softimage will be discontinued.  Softimage version 2015 will be the final release.

Making a Chrome Shader

Q: How do I make a chrome material?

Chrome - mia_material


A: Chrome is a highly reflective surface, but in the 3D world, a highly reflective shader looks kind of crappy without an environment to reflect, which is something that is taken for granted in the real world where we are automatically surrounded by tiles, ceilings, desks, windows, trees, sky, buildings etc. Making chrome is as easy as making a dark colored shader and giving it high reflectivity. Why make the shader dark? Because if you don't, the reflection will be added onto the color and the shader will look brighter and not as reflective as it should, its especially obvious on the standard Maya shaders [of course some degree of reflection blurring will make it look better -Mental Ray can do this but Maya Software renderer can't].

Brush Aluminum - mia_material


What is Three Point Lighting

Q: What's "Three point lighting"?


A: It's a lighting setup that uses a light as a key light or your main source of light. Another for a fill light, you know, the light that illuminates the spots where the key light doesn't hit, to eliminate pitch black areas and simulate ambient or indirect illumination. And a rim light that is placed more in the back of the subject to create an outline that accents the subject's contours. Some artists approach creating the rim light effect using materials instead of lights! Three point lighting doesn't necessarily describe the number of lights involved but rather the aspects of the scene the lights illuminate.

Glass not Transparent

Q: Why is my glass black/white/ some other solid color?


A: Could be one or a combination of reasons. 

  • Raytracing isn't turned on in the render settings 
  • Even if its turned on, the refraction traces may be too low to pass through the surfaces [also, max trace settings must be high enough to cover both reflection and refraction traces].
  • If Final Gathering is enabled the tracing should be checked as well, its very much like the raytrace settings.
  • Last but not least, the material's refraction tracing. Refraction Limit on standard Maya shaders and Max Trace Depth on mia_materials.

Grainy Shadows

Q: Why are my raytraced shadows so grainy?


A: The sampling is too low. Increase the shadows rays on the light[s], same goes for its "Area Light" high samples of the Mental Ray section if you checked it on, when this is on, the shadow rays attribute doesn't have an effect. These attributes in addition to the anti-aliasing in the render settings can eliminate grain at the cost of render speed so being careless with sampling can make you want to drop kick your machine.

Note: This assumes that Mental Ray is your renderer but the light or shadow sampling settings are pretty universal when it concerns grainy shadows.

Distorted Texture

Q: Why is the texture on my model all squashed and stretched?


A: Your UV's aren't laid out properly, look into UV Mapping. Going into detail on this subject isn't FAQ material so tough break.

Blocky Artifacts on Model

Q: Why does my model have these blocky patterns when I render it?


A: More than likely, you have a duplicate of your model in the same exact position as the original or your model has lamina faces (faces that sit in the exact same space, sometimes due to the user forgetting that they extruded some faces that they didn't bother moving around or undoing). Identical geometry sitting on top of each other can result in garbled shading in the rendered image.

Texture Moving Through Objects

Q: Why is my animated object moving through my texture in my rendered animation?


A: Chances are, you plugged a 3D texture or a projection into the shader and its staying stationary while your model is moving, so the texture placement node needs to be parented to the object.

Models Have Floating Vertices

Q: How can I cleanly delete edges and vertices?


A:You can select the edges and hit the delete key but that will leave vertices behind and you might unknowingly create messy geometry, on the other hand, if you wanted to redraw the edges while keeping the basic shape this method could come in handy.


The clean way to do it is to select the edges/vertices and use the "Delete Edge/Vertex" polygon procedure in the "Edit Mesh" menu.

Jagged Edges

Q: My models have jagged edges in the rendered image, why?


A: The anti-aliasing samples are too low, check the render settings but just don't go crazy since these will increase render times.  I think anything over 2 max samples is overkill in most instances.  Higher anti-aliasing also decreases noise and "graininess".

Texture Moving in Viewport

Q: Why is my texture acting weird in the viewport when I move my model in 3D space? It's flickering when I move the object!


A: Chances are you need to delete history on the model.

Missing Texture on Model

Q: Why I can't I see my texture on my model?


A: Hit "6" on the keyboard, this goes into hardware texturing mode [sometimes it's the simple stuff that get you!]. If that doesn't help, open the Attribute Editor on the material and scroll down to the "Hardware Texturing" section and make sure the "Textured channel" is NOT set to "none", preferably the "color" channel. If that doesn't work, then check the "Shading" menu in your panel[s] and make sure "use default material" is NOT checked.

Also, in some cases when the texture won't show even if you render it, it could be that your model has no UVs, you can use a quick automatic mapping to test it.

Missing Channelbox Inputs

Q: I just created a new cube
 and I'm trying to change the number of divisions in the channel box but there are no inputs why?


A: You need to turn on construction history in order for Maya to keep track of such things. It's the little icon in the upper right side portion of the screen with the white page on it. If you're using a version previous to 2009, then the icon looks more like a scroll than a flat sheet of paper.

Jagged Edges in Render View

Q: Why does my image within the Maya render view have jagged edges no matter what renderer and render settings I use?


A: If you've already cranked up your anti-aliasing settings then chances are its something really simple like the rendered image is being scaled down to fit inside the render window, so all you need to do is hit the "1:1" icon to display the actual size.

Thursday

NURBS vs Polygons vs Subdivision

Q: What are the differences between polygons, subdivisions and NURBS?


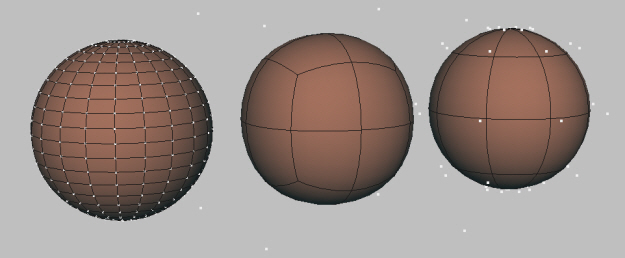
Polygonal, Subdivision, NURBS spheres from left to right


A:
Polygons are surfaces made up of faces, each face is an enclosure of edges, whether it be three edges, four edges, or more (n-gons). These surfaces can be made up of many faces, as many as your computer can handle or just a single face. Each edge runs in a straight line and the point where these lines meet is called a vertex. And since polygon edges flow in straight lines, they easily create hard, faceted surfaces but of course more faces are required to form smooth, curvy surfaces, effectively increasing the object's resolution or "poly count".  Of course, there is a polygon count threshold a given computer can handle before it starts to struggle. Many modern renderers have a feature that allows polygon objects to be smoothed at render time, this allows users to have lower counts for smoother, less hassling real time interaction. Poly objects can be combined and welded together, cut, sculpted, extruded, extracted, UV mapped etc.

 NURBS geometry is made of patches generated from curves. They easily form curvy rounded surfaces and placing points closer together enables the user to create sharper corners. These surfaces can be stitched together, trimmed, sculpted etc.

Subdivisional surfaces allow the user to focus on detailing regions instead of making the entire mesh heavier, hence the name subdivision. It feels like a hybrid of NURBS and polygons, easily generating smooth and rounded surfaces like NURBS while utilizing many polygonal tools.

-----

 So they are all capable of taking you to the same destination just using a different road, it's not uncommon for a modeler to convert back and forth between different geometry types. But at the end of the day it's all about your preference so try them all.

NOTEAs of Maya 2014 the subdiv surfaces tools have been removed from the Maya user interface, they are still available just hidden since the modeling method largely fell out of use.

Saturday

Maya Frequently Asked Questions(old Thread)

This post is depreciated but I know I've linked to this page so I'll leave it up.

Q :Why are the points/edges/etc I select on my model colored orange/red/yellow, and why does moving them affect more of my model than I want them to?


A: You turned on Soft Selection [most likely by hitting the "b" key] Hitting the "b" key again will turn it off, or you can take the long route and open the tool settings and toggle it there.

Also please note, this mode can be activated and used in the UV Texture Editor as well.


///////////////////////////////////////////////////////////////////////////////////////


Q: I'm trying to follow a tutorial and it says I need to go to the "Modeling" menu set, its not there, why?


Menu set selection


A: In later versions the menu set "Modeling" was split up into "Polygons" and "Surfaces". If this doesn't sit well with you then you can choose "customize" and create your own set.


  ///////////////////////////////////////////////////////////////////////////////////////

Q: I clicked something or pressed a key and my shelf and toolbar thing went missing, what do I do?


A: If you pressed Ctrl + Space then you've hidden most of the UI, pressing it again will bring it back.  Also you can bring back individual portions of the interface by going  to Display>UI Elements and checking on whatever you need or just show/restore them all and that option is found under the same Display menu. If you've hidden the main menus then you can access this display menu from the hotbox, simply hold down the space bar.


  ///////////////////////////////////////////////////////////////////////////////////////

Q: My models have jagged edges in the rendered image, why?


jagged edges and noise
A: The anti-aliasing samples are too low, check the render settings but just don't go crazy since these will increase render times.  I think anything over 2 max samples is overkill in most instances.  Anti-aliasing also affects noise and "graininess".


  ///////////////////////////////////////////////////////////////////////////////////////


 Q: Where did my Mental Ray renderer go? 


A: It's probably not loaded, go to Window>Settings/Preferences> Plug-in Manager and look for "Mayatomr.mll".
Loading Mental Ray


///////////////////////////////////////////////////////////////////////////////////////


Q: I can't see my move/rotate/scale manipulators, why?


Missing manipulators

A: Hit the + or - key to resize the them.  Also, if the rotate tool just won't show, it could be a display problem, you might need to update or roll back your graphic drivers. In all fairness, I've closed and reopened Maya and had the problem go away [yeah what the hell right?]


 ///////////////////////////////////////////////////////////////////////////////////////


Q: How can I cleanly delete edges and vertices?


A:You can select the edges and hit the delete key but that will leave vertices behind and you might unknowingly create messy goemetry, on the other hand, if you wanted to redraw the edges while keeping the basic shape this method could come in handy.

The clean way to do it is to select the edges/vertices and use the "Delete Edge/Vertex" polygon procedure


Deleting edges/vertices with the "delete" key

Deleting edges/vertices with the polygon function


/////////////////////////////////////////////////////////////////////////////////////// 

Q: Why I can't I see my texture on my model?


Troubleshooting texture display

A: Hit "6" on the keyboard, this goes into hardware texturing mode [sometimes it's the simple stuff that get you!]. If that doesn't help, open the Attribute Editor on the material and scroll down to the "Hardware Texturing" section and make sure the "Textured channel" is NOT set to "none", preferably the "color" channel. If that doesn't work, then check the "Shading" menu in your panel[s] and make sure "use default material" is NOT checked.

Also, in some cases when the texture won't show even if you render it, it could be that your model has no UVs, you can use a quick automatic mapping to test it.


  ///////////////////////////////////////////////////////////////////////////////////////


Q: Why is my texture acting weird in the viewport when I move my model in 3D space? It's behaving jittery!


A: Chances are you need to delete history on the model.


  ///////////////////////////////////////////////////////////////////////////////////////


Q: Why do my objects disappear into 3D space when I zoom out?


A: This happens when the camera "clips" objects off that are x units away for the sake of performance, select the camera, open the Attribute Editor and increase the far "clip plane".  In the same vein, the near clip plane will cut objects off when they get within x units of the camera which can be a little annoying if you need to zoom in very close to edit some tricky vertices. Camera clipping does not affect how the object[s] software render.


///////////////////////////////////////////////////////////////////////////////////////


Q: Why is my animated object moving through my texture in my rendered animation?


 A
Chances are, you plugged a 3D texture or a projection into the shader and its staying stationary while your model is moving, so the texture placement node needs to be parented to the object.


  ///////////////////////////////////////////////////////////////////////////////////////


Q: Why is the texture on my model all squashed and stretched?


A: Your UV's aren't laid out properly, look into UV Mapping. Going into detail on this subject isn't FAQ material so tough break.


  ///////////////////////////////////////////////////////////////////////////////////////


Q: I just created a new cube and I'm trying to change the number of divisions in the channel box but there are no inputs why?


Missing inputs

A: You need to turn on construction history in order for Maya to keep track of such things. It's the little icon in the upper right side portion of the screen with the white page on it. If you're using a version previous to 2009, then the icon looks more like a scroll than a flat sheet of paper. 


  ///////////////////////////////////////////////////////////////////////////////////////


Q: Why does my image within the Maya render view have jagged edges no matter what renderer and render settings I use?


A: If you've already cranked up your anti-aliasing settings then chances are its something really simple like the rendered image is being scaled down to fit inside the render window, so all you need to do is hit the "1:1" icon to display the actual size.


  ///////////////////////////////////////////////////////////////////////////////////////


Q: Why does my model have these blocky patterns when I render it?


Overlapping faces


A: More than likely, you have a duplicate of your model in the same exact position as the original or your model has lamina faces (faces that sit in the exact same space, sometimes due to the user forgetting that they extruded some faces that they didn't bother moving around or undoing). Identical geometry sitting on top of each other can result in garbled shading in the rendered image.


  ///////////////////////////////////////////////////////////////////////////////////////


Q: Why are my raytraced shadows so grainy?


A: The sampling is too low. Increase the shadows rays on the light[s], same goes for its "Area Light" high samples of the Mental Ray section if you checked it on, when this is on, the shadow rays attribute doesn't have an effect. These attributes in addition to the anti-aliasing in the render settings can eliminate grain at the cost of render speed so being careless with sampling can make you want to drop kick your machine.


  ///////////////////////////////////////////////////////////////////////////////////////


Q: Why is my glass black/white/ some other solid color?


A: Could be one or a combination of reasons.  

- raytracing isn't turned on in the render settings  

- even if its turned on, the refraction traces may be too low to pass through the surfaces [also, max trace settings must be high enough to cover both reflection and refraction traces].

 - if Final Gathering is enabled the tracing should be checked as well, its very much like the raytrace settings.

  -last but not least, the material's refraction tracing. Refraction Limit on standard Maya shaders and Max Trace Depth on mia_materials.


  ///////////////////////////////////////////////////////////////////////////////////////


Q: How do I make a chrome material?


A: Chrome is a highly reflective surface, but in the 3D world, a highly reflective shader looks kind of crappy without an environment to reflect, which is something that is taken for granted in the real world where we are automatically surrounded by tiles, ceilings, desks, windows, trees, sky, buildings etc. Making chrome is as easy as making a dark colored shader and giving it high reflectivity. Why make the shader dark? Because if you don't, the reflection will be added onto the color and the shader will look brighter and not as reflective as it should, its especially obvious on the standard Maya shaders [of course some degree of reflection blurring will make it look better -Mental Ray can do this but Maya Software renderer can't].


///////////////////////////////////////////////////////////////////////////////////////


Q: What's "Three point lighting"?


A: It's a lighting setup that uses one light as a key light or your main source of light. Another for a "fill" light, you know, the light that illuminates the spots where the key light doesn't hit, to eliminate pitch black areas and simulate ambient or indirect illumination. And a "rim" light that is placed more in the back of the subject to create an outline that accents the subject's contours. Some artists approach creating the rim light effect using materials instead of lights!


 ///////////////////////////////////////////////////////////////////////////////////////


Q: What are the differences between polygons, subdivisions and NURBS?


Poly SubD and NURBS spheres from left to right


A

Polygons are surfaces made up of faces, each face is an enclosure of edges, whether it be three edges, four edges, or more(n-gons). These surfaces can be made up of many faces, as many as your computer can handle or just a single face. Each edge runs in a straight line and the point where these lines meet is called a vertex. And since polygon edges flow in straight lines, they easily create hard, faceted surfaces but of course more faces are required to form smooth, curvy surfaces. Poly objects can be combined and welded together, cut, sculpted, extruded, extracted, UV mapped etc.

 NURBS geometry is made of patches generated from curves. They easily form curvy rounded surfaces, placing points closer together enables the user to create sharper corners. These surfaces can be stitched together, trimmed, sculpted etc.

Subdivisional surfaces allow the user to focus on detailing regions instead of making the entire mesh heavier, hence the name subdivision. It feels like a hybrid of NURBS and polygons, easily generating smooth and rounded surfaces like NURBS while utilizing many polygonal tools.
-----

 So they are all capable of taking you to the same destination just using a different road, it's not uncommon for a modeler to convert back and forth between different geometry types. But at the end of the day it's all about your preference so try them all.


 ///////////////////////////////////////////////////////////////////////////////////////


Q: Why do my models stretch and distort when I try to rotate them?


A: Sounds like a case of double grouping, check your Outliner and ungroup them.

This can occur after a lot of extract, duplicate face operations pile up in addition to user grouping that doesn't take this history into account. The grouping gets messy.


///////////////////////////////////////////////////////////////////////////////////////


Q: Do I need programming experience to learn MEL?


A: No. Prior programming experience can make concepts involved in MEL far easier to grasp though.


///////////////////////////////////////////////////////////////////////////////////////


Q: Do I need to learn MEL to make cool images with Maya?


A: No. While it isn't necessary, it is extremely handy since it can be used to create tools that speed up tasks tremendously, create unique effects and provides a better understanding of what goes on within Maya.


///////////////////////////////////////////////////////////////////////////////////////


Q: Which is better, Max, Maya or XSI?


A: They all can do pretty much the same things and they all have not so perfect sides to them, there are trials and learning editions, try them, find what suits you best and make a decision. It doesn't stop with those three programs, there is Lightwave, Cinema 4D and Blender (which is taking big steps and is free).

 Yeah yeah, I know the Maya icon is old but its my favorite <3.